What Is Band Locking?
Band locking lets you choose which cellular bands a modem is allowed to use.
By default, a modem automatically selects the band it thinks is best. In most cases, automatic selection is the right option. However, band locking can be useful when the modem keeps connecting to a weak, unstable, or congested band while a better supported band is available nearby.
⚠️ Important Compatibility Note
This guide is written specifically for Proxidize MX2 modems.
The general idea may be similar on other supported modems, but the interface, login page, menu names, and available band options may be different depending on the modem model and firmware.
To review currently supported modems, see Linux Agent: System Requirements & Supported Modems.
Before You Start
- Confirm that you are working with a Proxidize MX2 modem.
- Make sure the modem is online and reachable through its proxy.
- Confirm which bands are supported by your modem region and carrier.
- Avoid locking bands randomly. Choosing unsupported or poor-signal bands can disconnect the modem.
For supported MX2 modem bands, see Proxidize Modems Bands and Frequencies.
When Should You Use Band Locking?
Use band locking only when you have a reason to control the modem's band selection.
Common examples include:
- The modem keeps switching between bands and causing unstable performance.
- The modem connects to a supported band with weak signal.
- A nearby band has better speed or stability.
- Proxidize Support asks you to test a specific band.
If the modem is already stable, we recommend keeping band selection on automatic.
1. Access the MX2 Modem Web Interface
-
Activate the proxy for the specific MX2 modem you want to access.
You can do this using a proxy browser extension or a browser that supports manual proxy configuration.
-
Open a browser through that modem's proxy.
-
Enter the MX2 modem interface address:
http://192.168.1.1

-
Log in to the modem interface.
The default MX2 modem password is:
admin

If the modem interface does not open, confirm that you are browsing through the proxy of the modem you want to configure.
2. Check the Current Band
Before changing anything, check which band the modem is currently using.
-
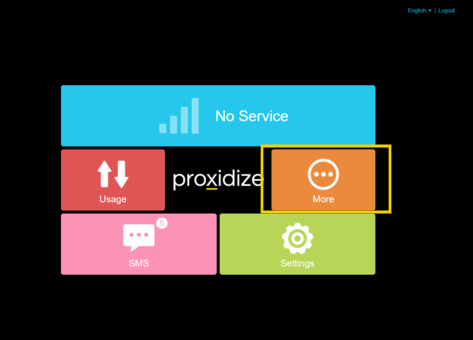
From the MX2 home screen, click More.
-
Click Diagnostic.
-
Review the connection information.
The Diagnostic page shows the modem's current connection details, including the currently used cellular band when available.


Write down the current band before making changes. This gives you a known working value to return to if the new band selection performs poorly.
3. Lock Bands on an MX2 Modem
-
Go back to the MX2 modem home screen.
-
Click Settings.
-
Open Lock Bands.
-
Select the band or bands you want the modem to use.

MX2 modems can lock to multiple bands at the same time. This can be useful when more than one supported band is available and you want to prevent the modem from using weaker bands.
-
Click Apply Changes to save the band selection.

-
Wait for the modem to reconnect.
The modem may briefly disconnect while applying the new band selection.
4. Confirm the Band Lock Worked
- Return to Main Menu
- Click More.
- Open Diagnostic.
- Check the current band shown in the connection details.

If the modem is connected and the Diagnostic page shows the expected band, the band lock was applied successfully.
If the Modem Disconnects
If the modem disconnects after applying a band lock, the selected band may not be supported by the carrier in that area, may have weak signal, or may not be supported by the modem region.
To recover:
- Return to Settings.
- Open Lock Bands.
- Remove the selected band lock or choose a different supported band.
- Apply the changes.
- Check More > Diagnostic again.
If you are unsure which band to choose, return the modem to automatic band selection.
Best Practices
- Start by checking the current band before changing settings.
- Lock only bands supported by both the modem and the carrier.
- Test one change at a time so you can compare results.
- Monitor connection stability after applying a band lock.
- Use automatic band selection unless there is a clear reason to lock bands manually.
Troubleshooting
| Issue | What to Check |
|---|---|
| The modem interface does not open | Confirm you are connected through the proxy of the modem you want to configure. |
| The password does not work | Confirm the modem is an MX2 and check whether the password was changed from the default. |
| The modem disconnects after locking a band | The selected band may not be supported by the carrier, modem region, or local tower. |
| The band list looks different | Interface and available bands can differ by modem region, firmware, or model. |
| Speed did not improve | Band locking does not guarantee better speed. Signal quality, tower load, carrier limits, and location still matter. |
Related Articles
- Proxidize Modems Bands and Frequencies
- Linux Agent: System Requirements & Supported Modems
- How Can I Access My Modem's Web Interface?
- Ensuring the Best Endpoint Uptime
Need Help?
If you have any questions, concerns, or need further clarification, feel free to reach out to us via live chat or email us directly at support@proxidize.com.